Security is paramount in this digital age. Ensuring that your devices are locked and secured with a passcode is a primary step in protecting your personal data. With the iPhone 14 being the latest in Apple’s lineup, it’s crucial to understand how to adjust its security settings. In this guide, we will walk you through the steps to change the passcode on an iPhone 14 seamlessly.
Step-by-Step Guide on Changing the Passcode
1. Unlocking Your iPhone 14
Before making any changes to your settings, ensure that you can access your device. Use your existing passcode or other security methods like Face ID to unlock the iPhone.
2. Navigating to Settings
Once unlocked, locate the Settings icon on your home screen. This gear-shaped icon is your gateway to all the device’s configurations and personalizations.
3. Accessing Passcode Settings
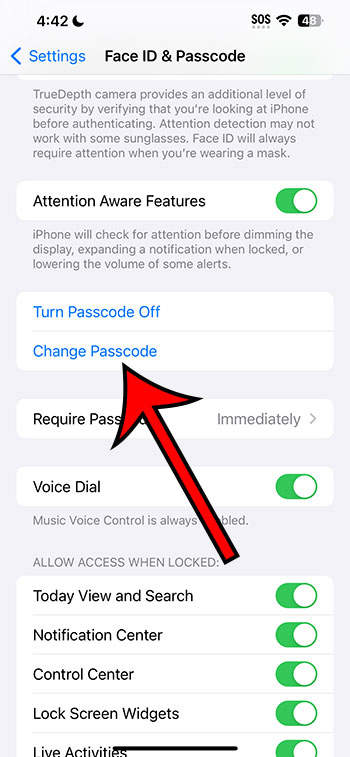
Scroll down in the Settings menu until you see Face ID & Passcode. Tap on it. You’ll be prompted to enter your current passcode for security reasons.
4. Choosing ‘Change Passcode’
Within the Face ID & Passcode menu, you will find an option labeled Change Passcode. Select this to begin the process.
5. Entering Your Old Passcode
As a security measure, Apple will request your old passcode one more time before allowing you to set a new one.
6. Setting Your New Passcode
Here, you’ll be prompted to enter a new passcode. iPhone 14 offers the option to set a 6-digit alphanumeric passcode, offering enhanced security. Consider creating a mix of numbers, letters, and symbols to ensure maximum protection.
Additional Tips for a Secure Passcode
Mix of Characters: Incorporate both upper and lower-case letters, numbers, and symbols to make your passcode robust.
Avoid Personal Information: Refrain from using easily guessable details like birth dates, anniversaries, or sequential numbers.
Update Regularly: For maximum security, consider changing your passcode periodically.
Related: How to Enable the iPhone 13 iMessage Setting
Setting Up Face ID for Enhanced Security
The iPhone 14 comes equipped with Face ID technology, providing a convenient and secure way to unlock your device.
1. Accessing Face ID Settings
In the Settings menu, navigate to Face ID & Passcode.
2. Setting Up Face ID
Click on Set Up Face ID. Follow the on-screen instructions which will guide you through the scanning process of your face.
3. Testing Face ID
Once set up, lock your device and try unlocking using Face ID to ensure it works flawlessly.
Restoring iPhone 14 to Default Passcode Settings
If you ever forget your passcode, you might need to restore your iPhone. Ensure you back up your data, as this process will erase everything.
1. Connecting to iTunes
Connect your iPhone 14 to a computer and open iTunes. If you don’t have iTunes, install it from Apple’s official site.
2. Entering Recovery Mode
While connected, force restart your iPhone by pressing and releasing the volume up button, then the volume down, and finally, holding the side button until the recovery mode screen appears.
3. Restoring in iTunes
In iTunes, locate your device and select Restore. This will erase all data and reset your passcode.
Conclusion
Ensuring that your iPhone 14 is secured with a strong passcode and backed up with Face ID is essential for your digital security. Follow the above steps to change your passcode whenever necessary. Remember, security is not just about setting a passcode; it’s about setting a strong one.
Matthew Rice has been working in the IT Field for almost two decades. He has been assisting coworkers and friends with their phones, computers, and other electronic devices. In addition to his IT roles, Matthew also enjoys freelancing and writing about tech topics, specifically tech tutorials about iPhones and Microsoft Office.